在 Raspberry Pi 4上使用 OpenCV 进行深度学习
-
介绍
本页介绍如何使用 OpenCV 运行深度学习模型。C++示例是为Raspberry Pi 4编写的,但无需任何修改,它们就可以在任何其他平台上编译。我们只指导您完成基础知识,因此最终,您有能力构建您的应用程序。有关更多技术信息,请参阅:https://docs.opencv.org/4.2.0/d6/d0f/group__dnn.html。
提示

通常,我们会收到一个问题,如果我们有一个带有预装框架和深度学习示例的 Raspberry Pi 4 的 SD 图像。
我们很乐意遵守这一要求。请在我们的GitHub页面上找到一个完整的Raspberry Pi 4,专门用于深度学习。从我们的GDrive网站下载zip文件,解压缩并在16 GB SD卡上刷新图像,然后享受!工具
首先,你当然需要安装OpenCV。请按照此页面上的说明进行操作。接下来,您需要一些用户友好的环境来构建应用程序。我们使用 Code::Blocks 而不是 Geany。后者不支持具有多个文件的项目,例如 Code::Blocks。Code::Blocks可以通过以下命令非常简单地安装。
$ sudo apt-get install codeblocks代码(Caffe 模型)
安装后,下面的C++代码可以加载到编辑器中。或者您可以从我们的GitHub页面下载整个项目。这里使用的模型是 chuanqi305的MobileNetV305-SSD Caffe网络。在 modelzoo.co 上可以找到许多其他模型。但是,请记住,大多数深度学习模型都非常需要资源。如果您在树莓派上运行它们,这可能会带来问题。您可以暂时增加内存交换空间以提供更多可用内存,如此处所述。我们不建议使用这种技术。交换空间用于偶尔的上下文更改,例如从 LibreOffice 切换到浏览器,反之亦然。不是在繁重的计算中,大量的单次读写操作可能会磨损SD卡。最重要的是,交换内存会延迟应用程序。
#include <stdio.h>
#include <opencv2/opencv.hpp>
#include <opencv2/dnn.hpp>
#include <opencv2/highgui.hpp>
#include <iostream>
#include <opencv2/core/ocl.hpp>
using namespace cv;
using namespace std;
const size_t width = 300;
const size_t height = 300;
const float scaleFector = 0.007843f;
const float meanVal = 127.5;

dnn::Net net;
const char* class_video_Names[] = { "background",
"aeroplane", "bicycle", "bird", "boat",
"bottle", "bus", "car", "cat", "chair",
"cow", "diningtable", "dog", "horse",
"motorbike", "person", "pottedplant",
"sheep", "sofa", "train", "tvmonitor" };

Mat detect_from_video(Mat &src){
    Mat blobimg = dnn::blobFromImage(src, scaleFector, Size(300, 300), meanVal);

	net.setInput(blobimg, "data");

	Mat detection = net.forward("detection_out");//	cout << detection.size[2]<<" "<< detection.size[3] << endl;
	Mat detectionMat(detection.size[2], detection.size[3], CV_32F, detection.ptr<float>());

	const float confidence_threshold = 0.25;
	for(int i=0; i<detectionMat.rows; i++){
		float detect_confidence = detectionMat.at<float>(i, 2);

		if(detect_confidence > confidence_threshold){
			size_t det_index = (size_t)detectionMat.at<float>(i, 1);
			float x1 = detectionMat.at<float>(i, 3)*src.cols;
			float y1 = detectionMat.at<float>(i, 4)*src.rows;
			float x2 = detectionMat.at<float>(i, 5)*src.cols;
			float y2 = detectionMat.at<float>(i, 6)*src.rows;
			Rect rec((int)x1, (int)y1, (int)(x2 - x1), (int)(y2 - y1));
			rectangle(src,rec, Scalar(0, 0, 255), 2, 8, 0);
			putText(src, format("%s", class_video_Names[det_index]), Point(x1, y1-5) ,FONT_HERSHEY_SIMPLEX,1.0, Scalar(0, 0, 255), 2, 8, 0);
		}
	}
    return src;}
int main(int argc,char ** argv){
    float f;
    float FPS[16];
    int i, Fcnt=0;
    Mat frame;
    chrono::steady_clock::time_point Tbegin, Tend;

    net = dnn::readNetFromCaffe("MobileNetSSD_deploy.prototxt", "MobileNetSSD_deploy.caffemodel");
    if (net.empty()){
        cout << "init the model net error";
        exit(-1);
    }

    //cout << "Switched to " << (cv::ocl::useOpenCL() ? "OpenCL enabled" : "CPU") << endl;
    //net.setPreferableTarget(DNN_TARGET_OPENCL);

    cout << "Start grabbing, press ESC on Live window to terminate" << endl;
    while(1){
        frame=imread("004545.jpg");  //need to refresh frame before dnn class detection

        Tbegin = chrono::steady_clock::now();

        detect_from_video(frame);

        Tend = chrono::steady_clock::now();
        //calculate frame rate
        f = chrono::duration_cast <chrono::milliseconds> (Tend - Tbegin).count();
        if(f>0.0) FPS[((Fcnt++)&0x0F)]=1000.0/f;
        for(f=0.0, i=0;i<16;i++){ f+=FPS[i]; }
        putText(frame, format("FPS %0.2f", f/16),Point(10,20),FONT_HERSHEY_SIMPLEX,0.6, Scalar(0, 0, 255));
        //show output
        imshow("frame", frame);

        char esc = waitKey(5);
        if(esc == 27) break;
  }

  cout << "Closing the camera" << endl;
  destroyAllWindows();
  cout << "Bye!" << endl;

  return 0;
}
关于此代码的几句话。
最重要的是声明您的网络是全局的。它将被几个例程调用多次。使其全局可最大程度地减少开销。另一个重要的一点是只加载一次拓扑和权重,因为这需要很多时间。由于它们在其生命周期内不会更改,因此每次向模型呈现新图像时加载它们是没有意义的,这种机制在其他示例中很常见。
由于 VOC2007 集中只有 20个类要检测,因此它们是硬编码的。如果有更多类,请在开始处理图片之前从文件中加载一次列表,如下一段中的 TensorFlow 示例所示。
在第 73 行,您会看到一个测试,以确定 OpenCL 是否可用。如果是这样,您可以通过取消注释下一行来加速应用程序。Raspberry Pi(目前)还没有能够与OpenCV一起运行的OpenCL库。如果您有另一台安装了 CUDA 的机器,您可以更改DNN_TARGET_CUDA的定义DNN_TARGET_OPENCL,以加快使用 CUDA 库的计算速度。
尽管OpenCV速度很快,但我们尽量防止对大内存块进行不必要的复制。只有一个“mat”对象可以保存图像。通过引用(Mat&src)将其传输到子例程,而不是通过值(Mat src)传递它,后者在后台生成副本。也永远不要返回带有大对象(如图片)的子例程,因为也会传递副本。所有这些技术最终都会提高您的帧速率。
其他一切或多或少都说明了自己是标准C++编码。一些额外的代码计算帧速率。你可以修剪它。汇编
为了成功编译,您需要告诉 Code::Blocks 在哪里可以找到必要的 OpenCV 库和标头。请按照此处的 OpenCV 相机示例的步骤进行操作。它还为您提供了有关如何使用此网络处理实时摄像机图像的足够线索。
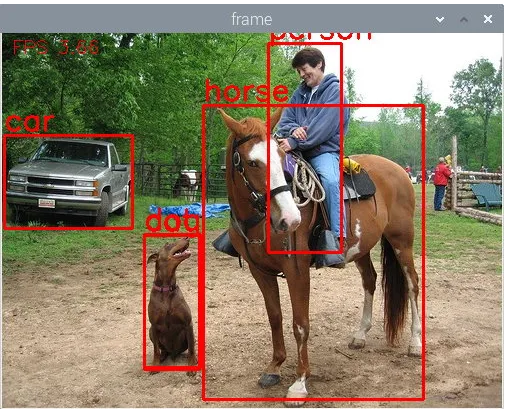
将 MobileNetSSD_deploy.prototxt、MobileNetSSD_deploy.caffemodel 和 004545.jpg 文件保存在工作文件夹中。这将与可执行文件位于同一文件夹中。仅当从 Code::Blocks IDE 运行应用程序时,才需要将这两个文件放在 Code::Blocks 本身的工作目录中,即项目文件和 obj 和 bin 文件夹所在的位置。再看这里bullet 24的解释,我们和 james.mp4电影的情况是一样的。
如果一切顺利,您应该获得与我们相同的屏幕转储。OpenCV的速度非常快,对于的Raspberry Pi 4来说,3.66FPS当然还不错。如果你仔细超频,你甚至可以获得 4.5 FPS。
代码(TensorFlow模型)
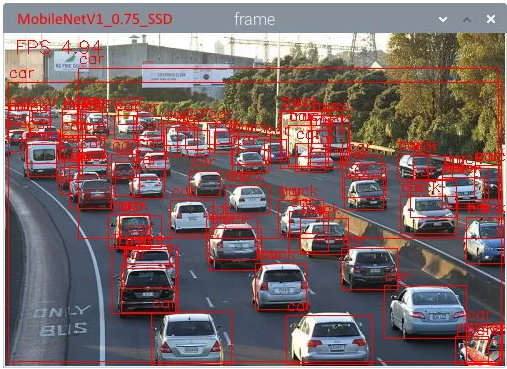
OpenCV 的 DNN 模块也支持 TensorFlow。让我们运行一些示例。从我们的 GitHub 页面下载带有冻结深度学习模型的整个项目。测试的两个型号是MobileNetV1-SSD和MobileNetV2-SSD。这两个模型都是使用 COCO 数据集训练的,该数据集的类数 (90) 比之前使用的 VOC2017 集 (20) 多得多。如下所示,与 Caffe 实现相比,代码几乎相同。
#include <stdio.h>
#include <opencv2/opencv.hpp>
#include <opencv2/dnn.hpp>
#include <opencv2/highgui.hpp>
#include <iostream>
s#include <opencv2/core/ocl.hpp>
using namespace cv;using namespace std;
const size_t width = 300;const size_t height = 300;

dnn::Net net;
std::vector<std::string> Names;
static bool getFileContent(std::string fileName){

	// Open the File
	std::ifstream in(fileName.c_str());
	// Check if object is valid
	if(!in.is_open()) return false;

	std::string str;
	// Read the next line from File untill it reaches the end.
	while (std::getline(in, str))
	{
		// Line contains string of length > 0 then save it in vector
		if(str.size()>0) Names.push_back(str);
	}
	// Close The File
	in.close();
	return true;}

Mat detect_from_video(Mat &src){
    Mat blobimg = dnn::blobFromImage(src, 1.0, Size(300, 300), 0.0, true);

	net.setInput(blobimg);

	Mat detection = net.forward("detection_out");//	cout << detection.size[2]<<" "<< detection.size[3] << endl;
	Mat detectionMat(detection.size[2], detection.size[3], CV_32F, detection.ptr<float>());

	const float confidence_threshold = 0.25;
	for(int i=0; i<detectionMat.rows; i++){
		float detect_confidence = detectionMat.at<float>(i, 2);

		if(detect_confidence > confidence_threshold){
			size_t det_index = (size_t)detectionMat.at<float>(i, 1);
			float x1 = detectionMat.at<float>(i, 3)*src.cols;
			float y1 = detectionMat.at<float>(i, 4)*src.rows;
			float x2 = detectionMat.at<float>(i, 5)*src.cols;
			float y2 = detectionMat.at<float>(i, 6)*src.rows;
			Rect rec((int)x1, (int)y1, (int)(x2 - x1), (int)(y2 - y1));
			rectangle(src,rec, Scalar(0, 0, 255), 1, 8, 0);
			putText(src, format("%s", Names[det_index].c_str()), Point(x1, y1-5) ,FONT_HERSHEY_SIMPLEX,0.5, Scalar(0, 0, 255), 1, 8, 0);
		}
	}
    return src;}
int main(int argc,char ** argv){
    float f;
    float FPS[16];
    int i, Fcnt=0;
    Mat frame;
    chrono::steady_clock::time_point Tbegin, Tend;

    for(i=0;i<16;i++) FPS[i]=0.0;

    //MobileNetV1
    net = dnn::readNetFromTensorflow("frozen_inference_graph_V1.pb","ssd_mobilenet_v1_coco_2017_11_17.pbtxt");
    //MobileNetV2
    //net = dnn::readNetFromTensorflow("frozen_inference_graph_V2.pb","ssd_mobilenet_v2_coco_2018_03_29.pbtxt");
    if (net.empty()){
        cout << "init the model net error";
        exit(-1);
    }

	// Get the names
	bool result = getFileContent("COCO_labels.txt");
	if(!result)
	{
        cout << "loading labels failed";
        exit(-1);
	}

    //cout << "Switched to " << (cv::ocl::useOpenCL() ? "OpenCL enabled" : "CPU") << endl;
    //net.setPreferableTarget(DNN_TARGET_OPENCL);

    cout << "Start grabbing, press ESC on Live window to terminate" << endl;
    while(1){
        frame=imread("Traffic.jpg");  //need to refresh frame before dnn class detection

        Tbegin = chrono::steady_clock::now();

        detect_from_video(frame);

        Tend = chrono::steady_clock::now();
        //calculate frame rate
        f = chrono::duration_cast <chrono::milliseconds> (Tend - Tbegin).count();
        if(f>0.0) FPS[((Fcnt++)&0x0F)]=1000.0/f;
        for(f=0.0, i=0;i<16;i++){ f+=FPS[i]; }
        putText(frame, format("FPS %0.2f", f/16),Point(10,20),FONT_HERSHEY_SIMPLEX,0.6, Scalar(0, 0, 255));
        //show output
        imshow("frame", frame);

        char esc = waitKey(5);
        if(esc == 27) break;
  }

  cout << "Closing the camera" << endl;
  destroyAllWindows();
  cout << "Bye!" << endl;

  return 0;
}
Caffe代码中的相同评论在这里适用;声明您的网络全局并加载一次,以及类标签。
OpenCL 或 CUDA 加速是一个选项(如果可用)。有关编译,请参阅上面的注释。
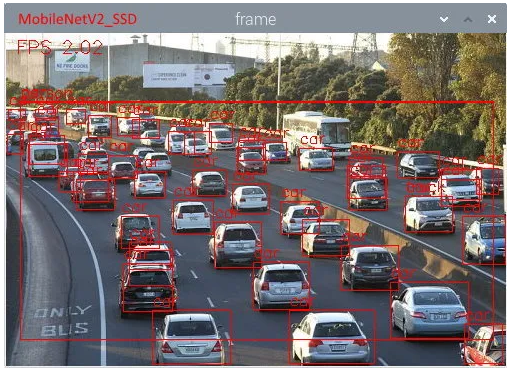
同样,OpenCV的速度非常快,Raspberry Pi 4的4.94 FPS非常好。当然,如果您记住我们必须对 90 种不同的对象进行分类。版本 V2 仍然稍慢一些,但另一方面,更准确一些。
更多TensorFlow模型可以在这里和ZOO中找到。就像在Caffe的相同言论;大多数模型在具有良好 GPU 的计算机上运行最佳。
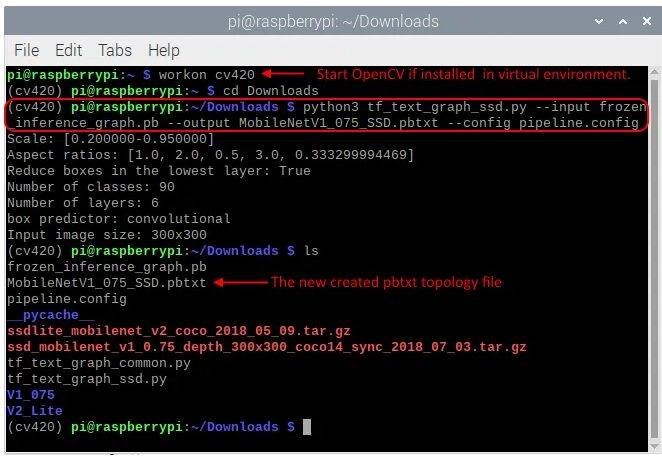
PBTXT 文件生成
OpenCV在运行TensorFlow模型时需要一个pbtxt拓扑文件。我没有提供,必须生成文件。OpenCV有一些用于此目的的工具。你可以在GitHub上找到它们。下载所有 tf_text_graph_*.py 文件并将其存储在文件夹中。将 frozen_inference_graph.pb 文件 pd 和 pipeline.config 文件移动到同一位置。现在,您可以运行相应的脚本,具体取决于所使用的模型类型。下面是我们如何用树莓派生成 MobileNetV1_075_SSD.pbtxt 的示例。
转载来自:https://qengineering.eu/deep-learning-with-opencv-on-raspberry-pi-4.html